Posted with permission - This was originally posted on WashburneMarine.com by Randy Washburne - I have reformatted Randy's original post to work with my blog format. In so doing I have attempted to retain all of the original look and feel including punctuation.
Randel Washburne
Randel Washburne
Copyright 2007
This chapter describes my most controversial activities on
the BC north coast. I built three little cabins, all of them illegally on Crown
Land. So I’ll begin with a justification and a caveat.
It was a vastly different and wilder coast in the early and
mid-eighties then it was today. There were many other cabins that I found and
was inspired by. Such squatters flourished much closer to civilization,
particularly on Vancouver Island between Florencia Bay and Flores Island before
it became Pacific Rim National Park and all were removed. Likewise, I found
many tiny huts in the lush southern Queen Charlottes, many built by canoe and
kayak paddlers (see my Queen Charlottes chapter). These were also removed when
Haida Gwaii National Park was established.
But on the mainland coast north of Vancouver Island, I found
almost nothing – one or two old cabins, and hardly any traces of previous
campers. There were few places where you could fit in a tent above the high
tide line without chopping out a space in the brush. It seemed too rugged,
inaccessible, or inhospitable to attract anyone. Assembling derelict materials
from the beach into a little shelter hidden in the forest just didn’t seem to
matter. It seemed unlikely that anyone would find them.
The Burnett Bay cabin was discovered, in a very pleasing
way. Passers-by, mostly kayakers, found it, stayed in it, left entries in its
impromptu journal, and told each other about it. Not one of these notes scolded
me for building it, or expressed regret about the cabin being at Burnett Bay.
In fact, the consensus was that it added to the quality of their experience
there. So I can’t dredge up much guilt for having built it, or for maintaining
and improving it for everyone to use.
But the time for that has passed. There are too many of us,
mainly us kayakers, using the remote BC coast, for individuals such as myself
to leave such large footprints behind.
Please
don’t use this chapter as an invitation for building squatter cabins. It is no
longer appropriate today. My cabins are quickly being reclaimed by
the voracious rain forest climate, and, for two out of three of them, that’s
for the best. I’m writing this not as an inspiration, but just because I know
that many people have appreciated my little hovels, enjoyed their shelter, and
were curious about how they were built. That’s it.
Triquet
Island 1977
[

I have least to say about building the first cabin, except
that it was a tribute to my inexperience. Since Pam and I came there in my
little sailboat “Murrelet”, I should have been able to supply myself with all
the tools and materials I would need, but I didn’t know what that would be.
I did bring a big toolbox full of tools and instruments that
I never used and which spent the summer gathering a nice coating of rust. And
there were two items that I failed to bring and was set back substantially by
their lack.
The first oversight was a big saw capable of getting through
logs two or more feet in diameter. Instead, I brought a 36-inch bow saw which
served up to a depth of about ten inches before bottoming out on its frame. (I
also failed to bring a spare blade, so when it broke, we made a special eighty-mile
round trip to Ocean Falls to buy one. The town was still thriving then and its
department store had 30-inch blades, which I extended to fit with a piece from
a shelf bracket.)
The bow saw was useless for the job that was needed most –
cutting bolts from cedar beach logs to make shakes for the siding and roof.
Ironically, I left the perfect tool at home – a four-foot, one-man cross cut
saw, probably made before WWI and bought in a Vermont junk store in 1965. It
looked like a huge carpenter’s saw with an extra handle on top that could be
moved from one end to the other. I didn’t know what a treasure AI had, and had
hardly used it. Later it became my most prized cabin-building and
firewood-cutting tool.
The second missing item was nails. I brought a pitiful
assortment. On our first shopping trip north to Bella Bella I bought a pound of
shake nails at the BC Packers’ general store in Old Bella Bella (across the
channel from Waglisla on Denny Island, but gone now). Otherwise, I scrounged. I
took the single-seat Folbot to all the neighboring beaches to look not just for
lumber, but for nails that I could extract. That wasn’t nearly enough, so I
made a special all-day trip in the Folbot to the east side of Spider Island.
The remains of a WWII coast watch station were located on the west side of the
island. A plank road, in ruins, lead across the island to the ruins of a
warehouse and dock. I spent the day climbing through brush to extract nails
that had been rusting for 35 years from rotten wood. Most of them turned out to
have too little metal left to straighten without breaking, much less drive.
To make up for the lack of nails, I resorted to cedar pegs,
or “trunnels” (a wooden ship-building term derived from “tree nails”). Fortunately,
I had in my big tool chest a full brace and bit set, with augers up to one
inch. These pegs proved very stout for joining the wall framing and rafters,
and outlasted most other parts of the structure.
To do the roof, since I lacked a saw capable of cutting
cedar bolts, I scrounged previously-cut cedar chunks on neighboring beaches,
but they were rare, and consequently the roof took all summer to cover. I’d
brought an antique froe, also bought in a Vermont junk store, hand-forged and
probably a hundred years old. Since it was designed for eastern oak shakes, it
was too short to make shakes as wide as some of the cedar pieces I found would
have allowed, but it worked well enough. I discovered what a joy splitting a
good piece of cedar can be and how many square feet of shakes can be derived
from a small piece of wood. My technique for serious shake production would not
develop until eight years later at the Burnett Bay cabin.

Building
Triquet, 1977. Upper left: cedar peg in place of nails.
My original intent was to build a log cabin using bark-free
drift logs off the beach, of which there were plenty right out in front. The
cabin size would be 9 by 7 feet, meaning that the logs were cut to 11 ½ and 8 ½
feet. I cut several about eight inches in diameter and discovered how heavy
salt-soaked logs can be. Even these cut lengths took all the energy Pam and I
could muster to get them into the woods and into place. So, after about four
courses of logs, I decided that I’d have to finish it as a framed structure,
with walls covered with shakes or whatever. A salt-box design seemed good since
the back rafters could rest on the existing log wall and the front rafters
would be supported by the front wall, which would contain windows.
For the framing, I did cut living trees, about six small
hemlocks which Pam skinned with the drawknife. I put them all together with the
cedar pegs. But to cover the walls I’d need to come up with lumber.
To find siding lumber, I took the Folbot to beaches on all
the surrounding islands. Many of these rocky or gravel coves faced directly
into the swells coming in from Hecate Strait, but on many days the swells were
low and I could get in and out with only minor surges. Ashore, I’d collect the
shorter pieces (such as four-foot 2x4’s) and put them inside the boat leaving
just enough room for myself. For the longer pieces I made four loops of line
that hung out across the deck on both sides, and slid the longer lumber into
them so that they were supported just above or at the waterline. Carrying
perhaps 300 pounds of lumber and barely able to paddle over my deck load, I
made slow progress home through the rolling swells without frightening myself
too badly (except now when I look back at it). At one beach on Edna Island I
found most of a full sheet of half-inch plywood that would be suitable for the
door. It was too big to support on the deck, so I paddled back with most of it
trailing in the water, and felt fortunate to survive that.
Since shakes were in such short supply, I covered the roof
with a single layer, overlapping each one about an inch with its neighbor on
either side. The result was air gaps between the courses of shakes, which made
the cabin drafty and doubtlessly contributed to its short life. Later, I made
all of my roof surfaces double thickness.
Amazingly, we were able to put up a structure we could move
into in only four days of work. The roof rafters were covered with a tarp and
the end and front walls were still open, but it was better than the tent. And I
was soon able to install the wood stove with the pipe exiting the top of the
end wall. Though the cabin wouldn’t hold heat yet, it was good for cooking and
the radiance was helpful for drying things out. This stove was my first attempt
at making one myself – just a sheet metal box with a removable door and with a
draft hole in it.
It took a month to finish the cabin, covering the roof as I
found the bolts for shakes, and building a bunk, table and shelves inside. The
floor remained uncovered, and not bad as the conifer-needle duff dried out. It
was fairly light and airy inside, with windows at the back end and in front,
and a large skylight over the table in front center. All of these were covered
with clear plastic, and I made a storm cover for the skylight out of scrap
plywood.
I next returned to Triquet Island in 1984. The cabin hadn’t
deteriorated in the intervening seven years, but the surroundings were changed
drastically. Commercial geoduck divers had set up their base camp there.
Apparently they decided that they needed more light, since they cut down
several of the big cedars. They built a large plywood-decked structure covered
with tarps as a kitchen and living area just up the hill behind the cabin. The
cabin itself was too small for the four of them, so they were using it for
storage. I looked around briefly and left.

The
cabin as it looked about 1986, after a kayak outfitter had converted the area
to a base camp. Note the growth of ground cover compared to'77, which was probably
due to the trees removed by the geoduck divers.
Four return trips over the next 17 years were more
encouraging. After Hakai Recreation Area was established, a kayak outfitter
took over the area as a base camp, and even put a picture of the cabin on his
brochure! It was no longer habitable – smelling of mold and dampness, but still
picturesque. The lower logs were rotting and the headroom was becoming lower.
The outfitter had adapted the divers’ kitchen platform to his own use and put
in five tent pads around the area. Paths connected them all together and the
ground cover grew in very nicely as shown. As of 2001, the Recreation Area
wardens had left the cabin alone, but as it continues to deteriorate, I would
expect it to be removed.
Burnett
Bay

This three-mile-long open bight faces west to Queen
Charlotte Sound two miles south of Cape Caution. The entire length is a single
beach all of which is exposed to surf from the ocean swells. A hook on the
south end leading out to Bremner Point provides some reduction in the surf size
due to refraction. Near here is the mouth of a creek. At high tide there is
enough water for a shallow-draft boat to enter (if the surf is low) and go up
stream for about a half mile.
At the north end of the bight there is a rocky area that
separates the long beach from another smaller one to the north. Just offshore
are two islets that provide quite good surf protection at low and mid tides,
though at higher tides the swells sweep around both sides and meet in chaotic
surf behind the islets.


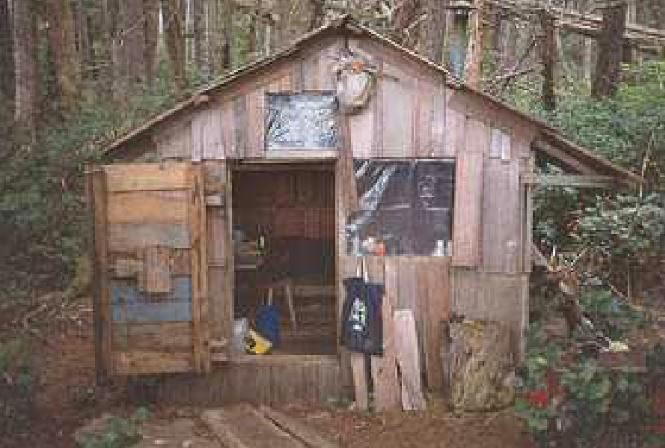
The
beach in front of the cabin, showing the surf protection between the two
islets. From a picture by Audrey Sutherland, showing her inflatable kayak at
the bottom.
My first visit to Burnett Bay was in 1983. I’d heard from a
local boater that there was a cabin up the creek here, so I landed in the light
surf in the hook and went to find it. It had been maintained by Haddington
John, who subsists on the coast using (at that time) a St. Pierre dory that he
was able to bring to the cabin at high tides. Many years later I met him at
Lesqueti Island and he told me an amazing story about Burnett Bay. More about
him in another chapter. I left a note for him and went on. I passed by the two
islets at the north end of the beach, since I was short of time and wanted to
get as far north as Wilke Point before heading back south to Shelter Bay the
next day.
The next year I passed the beach again, this time on my way
north to Prince Rupert. This time I did go ashore behind the two islets and saw
that with some brush clearing there could be fair campsites in the thick
forest, though there were no signs of any previous use. But this time my sights
were set on making distance, so I move on.
Visiting Haddington John’s cabin and seeing the vast allure
of the long beach and its unlimited supply of building materials got me
thinking about hiding a cabin at the north end of the beach. Now that I had
some experience with hard-shell kayaks, and my own “freighter”, the Shearwater,
I knew that I could bring in everything I needed to stay a few weeks and build
one. But carrying all the extra tools and materials along with food and gear
for camping meant that it would have to be within a few day’s travel of the
road’s end, and that trying to transport it all on the ferry to Bella Bella
would be far too troublesome (particularly in light of how kayaks and equipment
had to be unloaded from the Queen of the North in those days before the
terminal was built, as described in the Central BC chapter). Triquet Island was
simply too far away to get to with any regularity. I knew I could make Burnett
Bay in two travelling days in reasonable weather from Port Hardy.
Since everything was going to have to fit in the Shearwater,
I had to reduce and refine my tool and material list considerably. Having
learned a lot at Triquet Island, it wasn’t very hard. Here’s what I brought.
• The four-foot crosscut saw. Vital for cutting cedar bolt
and firewood for the stove. Actually not very bulky in the kayak rear hatch
laying in the bottom of the boat. I removed the top handle and used a section
of fire hose to protect the teeth (later I replaced that with a sheath of ¼
inch plywood that didn’t take much more room).
• Collapsible bow saw. Became my general carpentry saw for
cutting dimension lumber, etc. This was made from a 36 inch blade and spruce
frame tensioned with a twisted rope. Comes apart to fit in a long skinny
bag.
• Folding pruning saw. For general cutting, brush, or long
cuts in plywood, trimming shakes, etc.
• Hatchet. Sharpened really well with the diamond stone,
this was my most important tool for finishing shakes, getting a straight edge
on lumber, as well as splitting firewood.
• Nail puller and pry bar. For salvaging lumber.
• Axe. For heavier splitting and driving wedges.
• Three plastic falling wedges. Proved vital for extracting
cedar bolts from big logs, for preventing saw cuts from binding, and making
long cedar splits to make lumber.
• Froe. For making cedar shakes. 16-inch long blade, handle
made on site.
• Brace and bit. Inch and half-inch auger bits. The big one
used for cedar peg holes. The smaller was for countersinking nail holes into
logs so that 16-penny nails could be used to fasten poles, etc. On the first
trip I brought the brace, but later I replaced it with a small clamp that
fastened on the square auger shaft to make a T-handle to turn it – much smaller
though less efficient.
• Claw hammer.
• Spokeshave. Takes the place of a plane for smoothing.
• Drawknife. For skinning green poles or rough shaping.
Rarely used.
• Hand drill. For small holes in wood or metal – really no
substitute. Assortment of bits.
• Small hacksaw.
• Tin snips. For trimming stovepipe flashing.
• Tape measure and carpenters pencils.
• Needle nose pliers. Miscellaneous uses, very handy for
increasing the set on saw teeth if binding.
• Nail countersink. A large docking spike, with the end cut
off square. With the ½ auger, used to sink the heads of 16 penny
nails several inches into poles or thick lumber.
• Leather Work gloves.
• Files. Flat mill and triangular for saw sharpening.
• Several small c-clamps.
Materials:
• Two pounds of 16-penny nails. I used “sinkers”, which was
a mistake, because when I recovered the roof I found that most
had nearly rusted through. Should have used hot-dipped
galvanized nails.
• One pound of 8-penny sinkers. Should have been
galvanized.
• A pound each of 1 ¼ and 1 ¾ galvanized shake or box nails.
For attaching shakes. Both lengths were handy.
• A roll of aluminum flashing. For stove collar in the roof,
and heat protection around the stove, allowing it to be installed
closer to the walls, etc.
• Four inch stovepipe (for later stoves replaced with three
inch which works well enough). Three 2-foot lengths, nested inside each other
and rolled tightly and secured with duct tape.
• Wood stove. The first was made from a 20 mm ammo can, cut
down and finished with galvanized sheet metal. This one fitted into the
Shearwater ahead of my feet, barely. Later I made them from flat sections,
assembled with sheet metal screws, put together and fired for the first time on
site (if taken apart after firing, it won’t fit together again due to warping,
etc.). Galvanized stoves and pipe must be burned off hot outside the first time
to avoid noxious gasses from the galvanizing.
In late May, 1985, I drove to Port Hardy. I arranged to
leave my car at Wildwood Campsites because I could also launch there. I slept
in the back of the pickup and was up at 4:30 and on the water before seven. It
was a windless, clear morning and I made good time out of Hardy Bay, stopping
for a break behind Duvall Point and then out into Goletas Channel by nine. The
seas stayed flat and I kept going through the island groups across Queen
Charlotte Strait, arriving on the mainland at Shelter Bay at 1:30.
Now for the second half of the distance going up the coast.
The northwest headwind began to come up as I passed Allison Harbour, and got
stronger after I took a break at Skull Cove. Rounding the Fox Islands and
crossing Slingsby Channel was slow and wet. I finally arrived at the north end
of Burnett Bay at 8 pm, after thirteen hours of almost continuous paddling and
32 miles. Needless to say pretty beat, but thrilled to be here. Still lots of
work to do, since the tide was out and there was a quarter-mile carry to get
everything off the beach.
I established my camp just inside the trees. Not a bad spot,
but difficult to find an even surface for the tent, and no sign that anyone had
used it before. Today there are three ample flat tent pads there which get regular
use.
Just inland from there thick salal extended back into the
spruce and cedar forest. I climbed into it for about fifty feet and found an
area that when cleared would serve nicely for the cabin without needing to
remove any trees. It was far enough to be hidden (except for the roof ridge)
but close enough to the beach for easy access. I cleared the salal out of the
site and cut two trails, one to my campsite and one to the beach.

The next morning I went off down the beach to collect
materials. That took most of the morning, moving up and down the pile of logs,
spotting dimensioned lumber and throwing it out to the beach to be collected on
the way back. Before I knew it I found I was half way down the bay, up to a
mile and a half of sand over which to haul my finds. Fortunately my boat cart
came to the rescue, and I was able to stack and tie on several hundred points.
Its little seven-inch tires could support the weight on the damp sand near the
tide line, but they
sank in when I stopped, so I just kept moving. After several
such trips I had a good start ready by the site.
I carried in four big rocks (not plentiful in this sandy
area) to support each corner. The floor size would be 8 by 8 feet. Two 2 x 8
were laid on two opposite sides, and then I built two 8 by 4 foot rectangles of
similar material to form the end walls. With another plank across the sides to
connect up the tops of the end walls and plenty of temporary diagonal bracing,
the stout but flimsy structure was ready for rafters. These were some poles off
the beach connected and pegged together with a short brace a short distance
below the peak. I made one of these for each end of the cabin and then two
central ones out of lighter “2x4” that I split out of a big piece of cedar.
After three days, this even more flimsy structure was ready for being covered
with shakes, which I was counting on to stiffen it up, and it did.
Now for the shakes. This was the best part of the whole
process. The first challenge was to find a good cedar log. All of the driftwood
looked a similar gray to the extent that I couldn’t be sure, so I took the
hatchet and took a chip out which quickly identified them. Once a cedar log was
spotted, I had to look for a section without branches and straight grain. Many
of the cedar logs had spiral grain, which a visiting forester later told me
reduced the big cedars behind the cabin to negligible value (happily making
their removal as logs less likely). The lie of the grain was not easy to see
and several bolt that I cut ended up being unable due to twist or hidden
branches. The best were in really huge logs, partly because these had the best
oils that prevent the shakes from rotting, and also tended to have nice tight
grain. Unfortunately, they were the biggest challenge to saw and split out
(since I couldn’t cut all the way through these behemoths). Most of the time,
the best section would be in the middle of the log, so I had to make a saw cut
at both ends.
Sawing one of these big bolts could take all day. The saw
might not even extend out the far side, so I’d have to shift from one side to
the other. Fortunately my big saw had plenty of set in the teeth so it didn’t
tend to bind in these big cuts. At last I’d be ready to split out what I’d cut.
I’d drive one of my plastic wedges with the axe in near one of the cuts as far
as I could (trusting that I’d be able to get it back eventually). Then another
one next to it, which might or might not free up the first one. I continued
with all three, and then sharpened wooden wedges to hold the split open while
hopefully extracting at least two of the wedges. This continued on both sides
of the cuts, with no assurance that I’d get the whole thing out or my full
complement of wedges back (which would have cast the entire project in doubt).
But perhaps a half dozen wooden wedges later, there would be much snapping and
popping, and the whole thing would come loose.
Other logs were smaller and easier to cut, though they often
had to be raised up out of the sand with levers and washed off before cutting
could start. But the shakes from these smaller logs were always inferior.
Most of the work was now done and the fun really starts. But
first the tools have to be readied. The froe needs a handle – about two feet
long and stout enough to resist twisting and hammering on its upper end. It get
trimmed with the hatchet until it can be pounded into the froe’s socket,
pointing up away from the sharp edge of the blade. A cudgel is needed to pound
the froe into the bolt to start each shake, and it has to be dense enough to
stand up to pounding on the narrow froe and have enough heft to drive the froe.
I usually found a chunk of branch four to five inches thick and a foot long,
trimmed to fit my hand at one end.
The bolt is set up on one end. First it needs to be split so
that a shake can be started running across the grain (as in “edge-sawn” in
lumber-making terms). I generally aimed for quarter-inch thick shakes. The froe
blade is positioned on top of the bolt and gently pounded to set it into the
wood a little where it needs to be. Then I’d pound more vigorously to drive the
full width of the blade down into the wood. Since the blade is 16 inches long,
I would try to leave a few inches sticking out of the end and use that to
hammer the froe a bit below the top of the blade, alternating with hitting the
end of the handle to drive that down too.

Next comes twisting the froe with the handle to open and
deepen the split. I’d brace my knee against the bolt and pull the handle toward
me. This is the point to add something that helps immensely. I called it a
“follower” – just a rough dowel of wood about six inches long and about an inch
in diameter. With the gap held open by twisting the froe, the follower is
dropped into the split above the froe. This holds the gap open so that the froe
can be straightened and then worked a little deeper into the split by pressing
down alternately on the handle and end of the blade (good gloves prevent a
blister on that hand). Then twist the froe again, widening the gap. The
follower drops down, and the cycle can be repeated, gaining about an inch or
more each time. About six inches from the bottom (if the grain is good), the
new shake pops off with a very satisfying “poink”.
The surface of the new shake with be smooth at the top of
the split and gradually become increasingly uneven or wavy due to
irregularities in the grain. This is what distinguishes a really good bolt from
a poor one. Unless the grain is really good, it may have sections that waver
beyond the quarter-inch thickness, visible at the bottom of the shake as a
groove on one side and a ridge on the other. Since the ridge side needs to get
trimmed flat so that the shake lies tightly against its neighbor, it may result
in a gap toward the bottom, or a place that is very thin and likely to crack
and leak. If that happens, the shake gets broken apart at that point, and the
two pieces will still be put to good use.
I recently learned of a technique that I never got to try
but might help: turning the bolt over end-to-end between each split. This gives
each end one smooth surface on each end and may reduce losses due to grain
run-out. (This procedure definitely introduces more effort, since bolts might
weigh 50 pounds.)
With a good bolt, trimming is not much work, but for a
mediocre one (and I had many), it was a major chore. I sharpened the hatchet
carefully with the diamond stone. Then a series of shallow chops into the grain
would be made to limit how much would split off when I made the final cleaning
cut close to the grain. If the result seemed too thin at the end, I’d go ahead
and break it apart. I left the edges alone until the shake was to be applied so
that I could give it a final trim to fit its neighbor.
The majority of the shakes went on the roof, which would be
two layers thick throughout, with the joints overlapping as much as possible.
(At Triquet Island I spread them out leaving a gap between courses which was
much inferior but took fewer shakes.) Each successive course would overlap the
one below by about six inches, so that a 24-inch shake would cover an
additional area of 18 inches. The walls were a single layer, with the joints
(trimmed to fit as tight as possible) covered with a thin shake batten nailed
on last with a little moss stuffed inside to cut the drafts.
To set up the roof I collected all the one-by dimension
boards I could find – not many since they don’t survive getting ground up in
the logs in the surf as well as the thicker stuff. I only needed three-foot
pieces to span the rafters. These were nailed on at 18 inch intervals to
accommodate the overlap in the 24-inch shakes. Then I started at the lowest
row, nailing on each shake after trimming its edge to match the neighbor if
needed. Then came the second layer, staggering the overlaps from the layer
below.
On this second layer I made a mistake that I learned about
too late to fix. I places these upper shakes tightly together as with the lower
layer. I found out later that I should have left a half-inch gap. This would
allow the rain to flush out the inevitable needles, etch that accumulate in the
narrowest gap, turn to humus, and make a medium for moss and other plants to grow.
(Audrey Sutherland made it a point to clean out these narrow gaps and remove
moss on her visits, which helped a lot.) But as it was, it was ready for
replacement in less than twenty years.
Once up to the top courses at the peak on both sides, I
put on the westward side first, extending the tops well
above the level of those on the east side, then butting the
east ones tightly under the west ones. Then with one more course of narrow
shakes laid sideways on the east side, it made a peak that never leaked and
looked much better than the aluminum flashing I used at Triquet Island.

The walls were easy. I put up 2x4 nailers 24 inches apart,
being careful that the lower edges of the upper course didn’t extend below the
nailer so that I could tack the upper end of the battens below upward into the
nailer later.
Finally I cut pieces of shake to fit all the remaining gaps
under the eaves and at the bottom of the wall to the ground.
The windows were mylar (clear and more durable than plastic
sheeting), nailed up with thin shake battens with the plastic wrapped around
them.
The four-inch stovepipe went straight up through the roof
through a hole cut to allow about two inches of clearance, and covered with a
piece of aluminum flashing pushed up under the higher course of shakes and with
a four-inch hole to take the pipe.
The stove sat in a box of 2-by lumber about 18 inches high
and filled with sand lugged in from the beach. Then I lined its upper edges
with flashing and also the back wall so that the stove could be placed fairly
close to it.
The door was so heavy that a bear would have a much easier
time coming through the walls. It was built with 2-by boards and frame. I had
to make the hinges. These were two by fours nailed to the door and to the wall
so that those on the door rested on the ones on the wall. The hinge pins were
cedar one-inch dowels. The latch was also two by fours with a cedar dowel that
slid through a hole in the door edge into the frame. Another dowel served as
the handle, in a slot in the door so that it could be worked from the outside.
The illustrations describe it better.
For furniture, I built a 24-inch wide bunk with log
stringers and surfaced with 2-by lumber. Later when Linda came to visit I added
an upper bunk. It was located close under the eaves, so there was only about a
foot of headroom when lying down. To keep from rolling out of the bunk, I added
a rail pegged into the outer edge which could be swung out for access/egress.
A small table attached to the wall and a stool made for
seating for two with one person sitting on the bunk. A cooking counter next to
the door, with a shelf underneath with doors and wooden hinges for supposedly
mouse-proof storage. For other amenities, there was an outside shower platform
behind the rear wall with a holder for the hot water bag, soap, and pegs for
clothes.
There was still no floor in the cabin. I just didn’t have
the time or energy the first summer to find and drag back enough lumber to do
it. The next summer, Audrey Sutherland did it by herself, dragging the lumber
home without benefit of a cart (I used to have a wonderful camera-timer
self-portrait she'd sent me of her coming down the beach dragging a huge load
of lumber. Sadly I lost it.). Lacking the tools I had, she put down some
stringers and laid the boards un-nailed, where they have been ever since, as
solid as ever.
I’d built the cabin for myself and occasionally Linda,
hardly considering that anyone else might find and use it, though I hoped so.
The beach seemed so unvisited and the cabin so inconspicuous that discovery
seems unlikely. Still, I left an anonymous note pinned to the wall behind the
stove, indicating in short that the cabin was built for everyone to use
(illustration). It included a few instructions for taking care of the place,
and in ‘86 Audrey Sutherland added others in a cryptic hand at the bottom.
In the next chapter, I’ll tell you about how the cabin was
discovered and later modified, and about my third cabin enterprise, in Queen
Charlotte Strait.
No comments:
Post a Comment